
Ready to turn your Instagram feed into a storefront? Before you can start tagging products and making sales, there are a few essential boxes you need to check. This initial setup is the foundation of your entire shop, and getting it right from the start will save you a ton of headaches down the road.
Think of it this way: without this groundwork, Instagram’s powerful shopping features simply won’t be available to you.
Laying The Groundwork For Your Instagram Shop
First things first, you need to make sure your business is even eligible. This isn't just a technicality—it's about confirming you operate in a supported country and sell products that align with Meta's rules. Instagram Shopping is designed for selling physical goods, so if you're offering services or digital-only products, this might not be the right fit.
Your Instagram Shop Pre-Launch Checklist
Use this quick reference to confirm you have everything you need before starting the setup process.
| Requirement | Status Check | Why It's Critical |
|---|---|---|
| Eligible Country | Is your business located in a market supported by Instagram? | Instagram Shopping features are region-locked. |
| Physical Products | Do you sell physical goods? | Services and digital products are not supported. |
| Policy Compliance | Have you read and do your products meet Meta’s Commerce Policies? | Violations will get your shop rejected or shut down. |
| Business/Creator Account | Is your Instagram profile a Business or Creator account? | This is non-negotiable for unlocking e-commerce tools. |
| Your Own Website | Do you have an e-commerce website on your own domain? | Instagram needs to verify you're an established business. |
| Connected Facebook Page | Is your Instagram account linked to a Facebook Page? | This is how you'll manage your catalog and settings. |
Having all these elements in place before you begin is the key to a smooth, frustration-free launch.
Confirming Your Eligibility
Let's break it down. Your business has to be physically located in one of the countries where Instagram Shopping is active. The list is pretty long, but it’s still crucial to double-check that your region is on it.
More importantly, your products must comply with Instagram's commerce eligibility requirements. They have strict rules against selling things like weapons, animals, or certain medical products.
My Two Cents: Seriously, take five minutes and read Meta's official Commerce Policies before you do anything else. I've seen so many people get their shop rejected for an accidental violation. A quick check now will save you a world of frustration later.
The Non-Negotiable Business Account
Switching your personal profile to a Business or Creator account isn't optional—it's mandatory. This is the flip of the switch that unlocks everything: Commerce Manager, product tagging, and the analytics you'll need to see what's working. It tells Instagram you're a real business, ready to play by the rules.
Another critical piece of the puzzle is having your own e-commerce website on a domain you actually own. Instagram uses this to verify that your shop is tied to a legitimate and trustworthy online business. For anyone just getting started, picking the right home for your store is a huge decision. If you need some help, you can explore our guide on finding the best ecommerce platform for your specific needs.
Finally, your Instagram account has to be connected to a Facebook Page. This connection is the central nervous system for your social selling operation. It’s what lets you manage your product catalog and all your shop settings through Meta’s hub, Commerce Manager. Once these pieces are in place, you’re officially ready to build your shop.
Building a Product Catalog That Converts
Think of your product catalog as the engine of your Instagram Shop. It’s not just a list of items; it’s the entire technical backbone holding all your crucial product information—from images and descriptions to pricing and real-time inventory. Nailing this part is what creates a smooth, trustworthy shopping experience that actually turns casual scrollers into paying customers.
This is where you'll connect the dots between your Instagram profile, your Facebook Page, and the central hub for it all: Meta's Commerce Manager. It might sound a bit technical, but it’s a straightforward process that gives you total control over your social storefront.
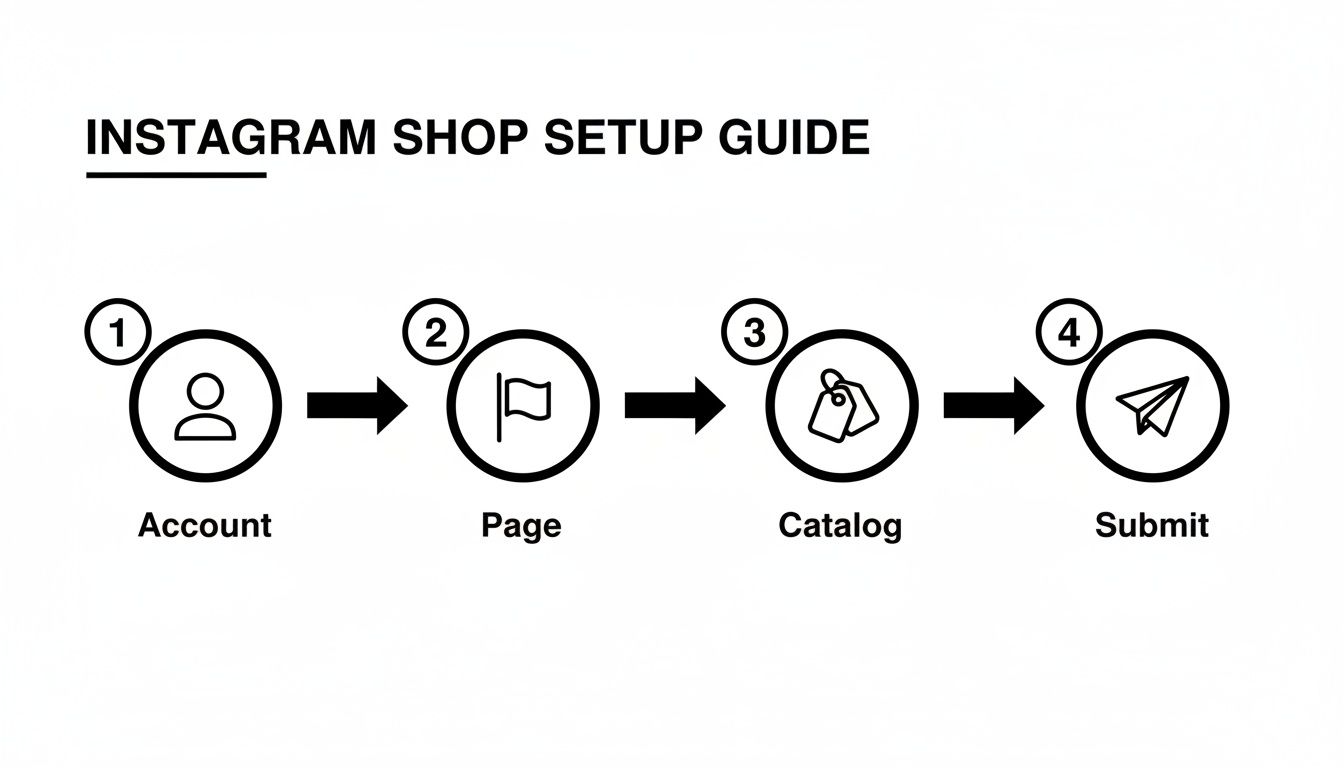
The whole setup boils down to a few key stages: getting your account ready, linking your Facebook Page, building out that all-important catalog, and finally, submitting it for approval. Once you understand this workflow, the path to launching your shop becomes much clearer.
Choosing Your Catalog Management Method
You've got two main ways to build and manage your product catalog. The right choice really comes down to what e-commerce setup you're already using and how much you want to automate.
Your first option—and the most popular for a reason—is to sync with an e-commerce platform partner. If you already have a store on a platform like Shopify or BigCommerce, this is a no-brainer. It creates a live connection that automatically updates your Instagram catalog whenever you add new products, tweak prices, or sell out of an item on your main website.
The second path is to create your catalog manually right inside Facebook Commerce Manager. This makes sense if you don't use a supported e-commerce platform or if you plan to sell a small, curated collection of products only on Instagram. Just be prepared for more hands-on work, as you’ll have to upload and manage every product detail yourself.
My Advice: For anyone selling more than just a handful of products, syncing with a platform like Shopify is a game-changer. It seriously cuts down on the risk of human error—like forgetting to update inventory—which saves you from the headache of selling out-of-stock items and dealing with unhappy customers.
Syncing with an E-commerce Platform
Connecting your existing online store is by far the most efficient way to get your products onto Instagram. It lets you take all the hard work you've already put into your website and bring it directly to social media.
Here's a quick look at how it generally works:
- Head to Commerce Manager: This is your command center for everything related to your shop.
- Click 'Add Catalog' to kick off the setup process.
- Choose 'Partner Platform': You'll see a list of supported platforms like Shopify, BigCommerce, and WooCommerce. Pick the one you use.
- Follow the On-Screen Prompts: The system will guide you to your e-commerce platform's site to authorize the connection. This usually just involves installing an app or extension and logging in to grant the necessary permissions.
Once you’re connected, your e-commerce platform will start pushing all your product data over to your new catalog. The first sync might take a little while if you have a lot of products, but after that, it will stay perfectly in sync with your main website.
A Special Note for Dropshippers on Media Sourcing
For dropshippers, setting up an Instagram Shop is a massive opportunity. The platform is home to over 200 million business profiles, and the numbers don't lie: 90% of users follow at least one business, while 81% use the app to actively research products. It’s a goldmine for visual-first selling.
But here’s the rub for most dropshippers: sourcing high-quality product media. Supplier stock photos are often low-resolution, watermarked, or just plain uninspiring. This is where you can really set yourself apart from the competition.
To build a professional-looking catalog, you need fantastic visuals. Tools like AliSave Pro are indispensable for this, letting you download high-res product photos, variant images, and even customer review photos straight from AliExpress with a single click. This gives you an instant library of authentic, compelling content to make your listings pop and build trust from day one. To find the best items to sell, you can also explore our guide on how to approach https://alisavepro.com/product-research-for-dropshipping/.
And if you want to create even more diverse visuals without booking a photoshoot, you might want to look into a product to model AI tool. They can turn your simple product shots into realistic lifestyle images.
Creating Your Catalog Manually
If you decide to go the manual route, you’ll be spending your time directly inside Commerce Manager. This method gives you pinpoint control over every listing, but it definitely requires more ongoing effort.
You'll start by going to Commerce Manager and choosing to create a new catalog. Instead of picking a partner platform, you’ll select the 'Manual' upload option. From there, it's a matter of adding your products one by one.
For each product you add, you’ll need to provide some key information:
- Images: High-quality photos are non-negotiable. Upload several, showing different angles and the product in use.
- Product Name: Make it clear, descriptive, and easy to understand.
- Description: Get into the details. Include materials, dimensions, key features, and what makes it special.
- Website Link: The direct URL to that specific product page on your website where customers can buy it.
- Price: The correct price and currency for the item.
- Category: Choose the most relevant category (e.g., Apparel & Accessories > Clothing) to help Instagram show it to the right people.
Getting all these details right ensures that when a potential customer taps on your product tag, they have everything they need to make a purchase. This is the final step before you can submit your shop for review and officially start selling on Instagram.
Getting Your Instagram Shop Approved
You've connected your product catalog, and now you’re at the final hurdle before you can start selling: the review process. This isn't just a formality. Someone from Meta's team is going to manually look over your entire setup to make sure your business is legit and your products meet their standards.
Honestly, this part can feel like a waiting game, but knowing what they're looking for can make all the difference. Think of it as an application to join an exclusive club. Instagram needs to protect its users, so they’re pretty strict about who they let in.
My Two Cents: Treat this review seriously. Meta's goal is to ensure every shop on their platform is trustworthy and professional. A sloppy website or a questionable product lineup is a red flag they won't ignore.
Success really comes down to proving you're a real, established business. This is exactly why having your own e-commerce store is a non-negotiable part of the process—it acts as your brand's home base and a clear sign of legitimacy.
What the Review Team Is Actually Checking
The reviewers have a mental checklist they're running through. If you can tick all these boxes before you submit, you're setting yourself up for a quick approval.
They’re focused on three main things:
- Following the Rules: Your products have to be in full compliance with Meta's Commerce Policies. This means no prohibited items (the list is long, so read it!), no wild claims, and honest product photos.
- A Real, Working Website: They will click the link in your bio. They expect to land on a fully functional e-commerce site with easy-to-find contact info, clear shipping and return policies, and a secure checkout. A "coming soon" page won't cut it.
- A Trustworthy Profile: Your Instagram account itself needs to look like a genuine business. This means a complete bio, a professional logo or profile picture, and a history of quality posts. A brand-new, empty account is a huge red flag.
For dropshippers, getting this right is a massive opportunity. Instagram’s ad revenue is expected to blow past $68 billion in 2025, and by 2026, it's projected to make up 53.1% of Meta's total US ad spend. This is where the customers are.
That’s why you can’t skimp on presentation. Using a tool like AliSave Pro to download clean, high-res media from AliExpress helps you build a professional-looking catalog from the get-go, which is exactly what reviewers want to see. You can dig into more stats about Instagram's advertising power on electroiq.com.
Flipping the Switch: From Approved to Active
The review usually takes a few business days, but I've seen it happen faster. You'll get a notification either way. Once you get that approval, it’s time to officially launch your shop.
The very first thing you need to do is turn on the shopping features in your Instagram settings. It’s a simple but crucial step to make everything visible.
Just head to your profile, tap the three lines in the corner, and find your way to Settings and privacy > Business tools and controls. From there, tap Set Up Instagram Shopping and follow the last few prompts.
Once that's done, a "View Shop" button will pop up on your profile, giving your followers a direct path to browse your products. You're now officially in business and can start tagging products in your posts, Stories, and Reels to drive sales directly from your content.
Turning Your Content Into Shoppable Experiences
Getting your Instagram Shop approved is a huge milestone, but honestly, it’s just the starting line. Now the real work—and the fun—begins. It's time to transform your everyday content into a powerful, direct revenue stream by making your posts, Stories, and Reels shoppable.
This is where you finally bridge that gap between inspiration and purchase, turning a follower's passive scrolling into an active shopping trip. The whole point is to seamlessly weave your products into the content your audience already loves, making it ridiculously easy for them to buy what they see without ever leaving the app. A solid Content Strategy for Ecommerce is the backbone here, not just for creating shoppable posts but for optimizing your entire Instagram Shop to drive sales and build a loyal following.
Mastering Product Tags Across All Formats
The product tag is your most important tool in this whole setup. It's that little shopping bag icon that lets followers tap an item in a photo or video and instantly see its name and price. Instagram gives you a few different places to use these tags, and each one has its own strategic advantage.
Knowing where and when to tag your products can make all the difference. Some formats are perfect for showcasing a whole look, while others are built for quick, impulsive buys.
Where to Use Product Tags on Instagram
| Content Format | Best Use Case | Pro Tip for Sellers |
|---|---|---|
| Feed Posts & Carousels | Ideal for high-quality lifestyle shots or studio images. You can tag up to five products per single image or twenty in a carousel. | Use carousels to showcase an entire collection or a complete outfit. It's a great way to upsell and show how different items work together. |
| Instagram Stories | Perfect for behind-the-scenes content, quick tutorials, or limited-time offers. You tag one item per Story using the "Product" sticker. | Create a sense of urgency. The ephemeral nature of Stories makes them great for flash sales or dropping a new product. |
| Instagram Reels | Your go-to for showing products in action. Tagging products in Reels captures attention with entertaining, short-form video. | Focus on demonstration or transformation. Show your product solving a problem or being used in a fun, creative way. Check out our guide on the ideal https://alisavepro.com/instagram-reels-format/ to really nail it. |
Ultimately, a smart strategy uses a mix of all three formats to keep your audience engaged and provide multiple pathways to purchase.
My Two Cents: Don't just slap tags on generic product photos against a white background. The magic happens when you tag items in authentic, relatable content. Tag a ceramic mug in a cozy morning routine Reel or a necklace in a user-generated photo you've re-shared. This makes the sale feel like a natural extension of the story you're telling, not a disruptive ad.
How To Weave Tags in Naturally To Drive Sales
The key to successful shoppable content is authenticity. People don't want to feel like they're being hit with a sales pitch every time they open the app. Instead of just posting flat product shots, you need to weave your tags into content that tells a story.
Think about a home decor brand, for example. Instead of just a photo of a pillow, show it styled on a couch in a beautifully decorated living room. Tag the pillow, the throw blanket, and maybe even the art on the wall. This not only shows the products in context but also inspires customers with a complete vision they can bring into their own homes.
This high-engagement approach is what makes Instagram Shops so powerful. It’s no surprise that Reels and Stories are dominating—they’re expected to account for over half of all ads by 2025. In fact, Story ad revenue alone hit a staggering $15.95 billion in 2022. The payoff is clear: Instagram’s average engagement rate is projected to hit 0.48% in 2025, which is more than triple what you see on Facebook.
A Game-Changing Tactic for Dropshippers
For dropshippers, this is where you can build immense trust and social proof, which is often the biggest hurdle. When you're sourcing product media from your supplier, don't just stop at their professional photos. The real gold is buried in the customer review section.
This is where a tool like AliSave Pro becomes an absolute must-have. You can instantly download not only the high-resolution product photos and variant images but also the photos and videos left by real customers in their reviews. These user-generated visuals are incredibly powerful.
Imagine creating a carousel post. The first image is a polished, professional shot of your product. The following slides? They're authentic photos from happy customers using that exact item, each with a product tag. This one-two punch of professional polish and genuine social proof is a conversion powerhouse. It shows potential buyers that real people already love what you're selling.
By strategically mixing these media types, you stop looking like just another dropshipping store and start building a credible brand that customers actually trust enough to buy from. It's a simple workflow that elevates your shoppable posts from basic product listings into compelling, trust-building experiences.
Fine-Tuning Your Shop to Actually Make Sales
Getting your Instagram Shop approved and live is a great start, but let's be honest—that’s just the starting line. The real work begins now. It’s time to turn that shiny new storefront into a reliable sales machine.
This isn’t about a massive, time-consuming overhaul. Instead, we’re focusing on the small but crucial details that convince casual scrollers to become confident buyers. It's all about polishing the experience with great descriptions, smart organization, and clear policies that build instant trust.
Writing Descriptions That Do the Selling for You
Your product photos are what stop the scroll, but your descriptions are what seal the deal. A lazy description is just leaving money on the table. Your goal here is simple: answer every question a potential customer might have before they even think to ask it.
Don't just list the basics. Instead of saying "cotton t-shirt," paint a picture. Try something like, "A buttery-soft, breathable 100% organic cotton tee, perfect for layering on cool evenings or wearing solo on a sunny day." See the difference? You're not just selling an item; you're selling a feeling or a solution to a problem.
To make your descriptions really pop, make sure they include:
- The Nitty-Gritty Details: Be specific. Include materials, dimensions, care instructions, and sizing info. Is it true to size, or should they size up? Tell them!
- Search-Friendly Keywords: Put yourself in your customer's shoes. What words would they type into the search bar? "Black mini dress" is okay, but "black sequin mini dress for parties" is so much better.
- A Touch of Story: Briefly explain what inspired the product or suggest a unique way to use it. That human touch goes a long way in building a connection.
Organizing Products with High-Converting Collections
Imagine walking into a messy, disorganized retail store. You’d probably turn around and leave, right? The same goes for your Instagram Shop. This is where collections save the day. Grouping related products together creates a curated, guided shopping experience that helps customers find what they love, faster.
You’ll set these up in your Commerce Manager, and they’ll show up as neat little tabs on your shop. Instead of one long, overwhelming list of products, you can create thoughtful categories that just make sense.
Here are a few ideas for collections that work really well:
- New Arrivals: This creates a sense of urgency and gives people a reason to keep coming back.
- Seasonal Picks: Think "Summer Getaway Essentials" or "Cozy Fall Favorites."
- Best Sellers: Let social proof do the talking by highlighting your most popular items.
- Shop by Category: Simple and effective. "Tops," "Bottoms," "Accessories," you get the idea.
- Gift Guides: Perfect for holidays like Valentine's Day or Mother's Day.
My Two Cents: Don't go crazy with collections. Start with 3 to 5 well-defined categories. The goal is to make it easier for people to find what they want, not to create a confusing maze of options.
Building Trust with Crystal-Clear Shop Policies
Nothing spooks a potential buyer faster than uncertainty. Before they even think about clicking "buy," customers need to know the deal with shipping and returns. Having clear, easy-to-find policies isn't just a nice-to-have; it's essential for building the trust required to make a sale.
Your website, which is connected to your shop, should have dedicated pages for this info. And please, write them in plain English, not legal jargon.
For your shipping policy, make sure you cover:
- Processing times (e.g., "We pack and ship all orders within 1-2 business days").
- Shipping methods and their estimated delivery windows.
- All shipping costs, including how to qualify for free shipping.
- International shipping details, if you offer it.
For your returns policy, be direct about:
- The return window (e.g., "30 days from the delivery date").
- What condition the item needs to be in to qualify for a return.
- Who is responsible for return shipping costs.
- How and when they can expect their refund.
These might seem like minor details, but they give a customer the peace of mind they need to click "Add to Cart" with confidence.
Nailing the Look: A Cohesive and Professional Vibe
Finally, always remember that your Instagram Shop is a direct extension of your brand. Every single element, from your product photos to your collection cover images, should feel connected and on-brand. This visual consistency is what elevates your shop from looking like a hobby to a legitimate, trustworthy business.
Use high-quality, well-lit photos that all follow a similar style. Whether you love bright, airy lifestyle shots or clean studio photos on a solid background, pick a lane and stick to it. This creates a polished, predictable browsing experience that reinforces your brand identity. When every detail feels intentional, you're not just selling products—you're building a brand people are excited to buy from again and again.
Answering Your Top Instagram Shop Questions
Setting up an Instagram Shop can feel like navigating a maze, and it’s completely normal to have a few questions along the way. I've seen countless sellers hit the same roadblocks, so let's clear up some of the most common points of confusion. Getting these answers straight can save you a ton of headache.
What if My Shop Gets Rejected?
First off, don't panic if your initial submission is rejected. It happens more often than you think, and it's usually fixable.
The most common culprits are simple policy oversights or an incomplete website. Take a deep breath and carefully re-read Meta's Commerce Policies. Then, comb through your website. Does it have crystal-clear contact info, shipping details, and a return policy? Often, just adding these missing pieces is enough. Once you've shored things up, you can request another review right from your Commerce Manager.
Checkout on Instagram vs. Your Website
Another thing that trips people up is the checkout process. If you’re a seller in the United States, you’ll most likely be using Checkout on Instagram. This is a huge advantage because your customers can buy your products without ever leaving the app—it’s seamless.
For sellers in other supported countries, Instagram will send shoppers to your website to finish their purchase. Both methods work well, but the in-app option definitely reduces friction and can help boost conversions.
How Long Does Approval Really Take?
This is the million-dollar question.
While there’s no set-in-stone timeline, most shops get the green light within a few business days. That said, some accounts need a deeper look, which can stretch the timeline. The best advice I can give is to be patient. Submitting over and over again won't make it go any faster.
Do I Absolutely Need a Website to Sell?
This is a big one, so let’s be direct: yes, you do. You cannot set up an Instagram Shop without your own e-commerce website on a domain you own.
Think of it from Meta's perspective. Your website is proof that you're a legitimate business. It's where they verify your brand, check your policies, and confirm you have a secure place for customers to make purchases. It’s the foundation of trust they need before letting you sell on their platform.
Ready to build a professional-looking catalog that gets approved faster? With AliSave Pro, you can download high-resolution product photos, variant images, and even customer review photos from AliExpress in a single click. Streamline your media sourcing and create stunning, trustworthy listings for your Instagram Shop. Get started for free at alisavepro.com.